Contents:
- Introduction
- The Basics
- Active FTP
- Active FTP Example
- Passive FTP
- Passive FTP Example
- Summary
- References
- Appendix 1: Configuration of Common FTP Servers
Introduction
One of the most commonly seen questions when dealing with firewalls and other Internet connectivity issues is the difference between active and passive FTP and how best to support either or both of them. Hopefully the following text will help to clear up some of the confusion over how to support FTP in a firewalled environment.
This may not be the definitive explanation, as the title claims, however, I’ve heard enough good feedback and seen this document linked in enough places to know that quite a few people have found it to be useful. I am always looking for ways to improve things though, and if you find something that is not quite clear or needs more explanation, please let me know! Recent additions to this document include the examples of both active and passive command line FTP sessions. These session examples should help make things a bit clearer. They also provide a nice picture into what goes on behind the scenes during an FTP session. Now, on to the information…
The Basics
FTP is a TCP based service exclusively. There is no UDP component to FTP. FTP is an unusual service in that it utilizes two ports, a ‘data’ port and a ‘command’ port (also known as the control port). Traditionally these are port 21 for the command port and port 20 for the data port. The confusion begins however, when we find that depending on the mode, the data port is not always on port 20.
Active FTP
In active mode FTP the client connects from a random unprivileged port (N > 1024) to the FTP server’s command port, port 21. Then, the client starts listening to port N+1 and sends the FTP command PORT N+1 to the FTP server. The server will then connect back to the client’s specified data port from its local data port, which is port 20.
From the server-side firewall’s standpoint, to support active mode FTP the following communication channels need to be opened:
- FTP server’s port 21 from anywhere (Client initiates connection)
- FTP server’s port 21 to ports > 1024 (Server responds to client’s control port)
- FTP server’s port 20 to ports > 1024 (Server initiates data connection to client’s data port)
- FTP server’s port 20 from ports > 1024 (Client sends ACKs to server’s data port)
When drawn out, the connection appears as follows:
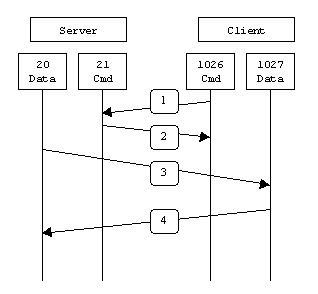
In step 1, the client’s command port contacts the server’s command port and sends the command PORT 1027. The server then sends an ACK back to the client’s command port in step 2. In step 3 the server initiates a connection on its local data port to the data port the client specified earlier. Finally, the client sends an ACK back as shown in step 4.
The main problem with active mode FTP actually falls on the client side. The FTP client doesn’t make the actual connection to the data port of the server–it simply tells the server what port it is listening on and the server connects back to the specified port on the client. From the client side firewall this appears to be an outside system initiating a connection to an internal client–something that is usually blocked.
Active FTP Example
Below is an actual example of an active FTP session. The only things that have been changed are the server names, IP addresses, and user names. In this example an FTP session is initiated from testbox1.slacksite.com (192.168.150.80), a linux box running the standard FTP command line client, to testbox2.slacksite.com (192.168.150.90), a linux box running ProFTPd 1.2.2RC2. The debugging (-d) flag is used with the FTP client to show what is going on behind the scenes. Everything in red is the debugging output which shows the actual FTP commands being sent to the server and the responses generated from those commands. Normal server output is shown in black, and user input is in bold.
There are a few interesting things to consider about this dialog. Notice that when the PORT command is issued, it specifies a port on the client (192.168.150.80) system, rather than the server. We will see the opposite behavior when we use passive FTP. While we are on the subject, a quick note about the format of the PORT command. As you can see in the example below it is formatted as a series of six numbers separated by commas. The first four octets are the IP address while the second two octets comprise the port that will be used for the data connection. To find the actual port multiply the fifth octet by 256 and then add the sixth octet to the total. Thus in the example below the port number is ( (14*256) + 178), or 3762. A quick check with netstat should confirm this information.
testbox1: {/home/p-t/slacker/public_html} % ftp -d testbox2
Connected to testbox2.slacksite.com.
220 testbox2.slacksite.com FTP server ready.
Name (testbox2:slacker): slacker
—> USER slacker
331 Password required for slacker.
Password: TmpPass
—> PASS XXXX
230 User slacker logged in.
—> SYST
215 UNIX Type: L8
Remote system type is UNIX.
Using binary mode to transfer files.
ftp> ls
ftp: setsockopt (ignored): Permission denied
—> PORT 192,168,150,80,14,178
200 PORT command successful.
—> LIST
150 Opening ASCII mode data connection for file list.
drwx—— 3 slacker users 104 Jul 27 01:45 public_html
226 Transfer complete.
ftp> quit
—> QUIT
221 Goodbye.
Passive FTP
In order to resolve the issue of the server initiating the connection to the client a different method for FTP connections was developed. This was known as passive mode, or PASV, after the command used by the client to tell the server it is in passive mode.
In passive mode FTP the client initiates both connections to the server, solving the problem of firewalls filtering the incoming data port connection to the client from the server. When opening an FTP connection, the client opens two random unprivileged ports locally (N > 1024 and N+1). The first port contacts the server on port 21, but instead of then issuing a PORT command and allowing the server to connect back to its data port, the client will issue the PASV command. The result of this is that the server then opens a random unprivileged port (P > 1024) and sends the PORT P command back to the client. The client then initiates the connection from port N+1 to port P on the server to transfer data.
From the server-side firewall’s standpoint, to support passive mode FTP the following communication channels need to be opened:
- FTP server’s port 21 from anywhere (Client initiates connection)
- FTP server’s port 21 to ports > 1024 (Server responds to client’s control port)
- FTP server’s ports > 1024 from anywhere (Client initiates data connection to random port specified by server)
- FTP server’s ports > 1024 to remote ports > 1024 (Server sends ACKs (and data) to client’s data port)
When drawn, a passive mode FTP connection looks like this:
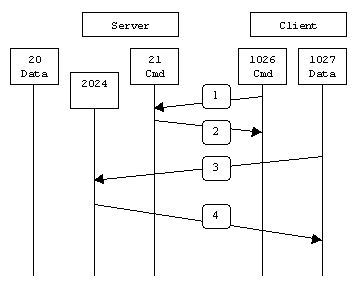
In step 1, the client contacts the server on the command port and issues the PASV command. The server then replies in step 2 with PORT 2024, telling the client which port it is listening to for the data connection. In step 3 the client then initiates the data connection from its data port to the specified server data port. Finally, the server sends back an ACK in step 4 to the client’s data port.
While passive mode FTP solves many of the problems from the client side, it opens up a whole range of problems on the server side. The biggest issue is the need to allow any remote connection to high numbered ports on the server. Fortunately, many FTP daemons, including the popular WU-FTPD allow the administrator to specify a range of ports which the FTP server will use. See Appendix 1 for more information.
The second issue involves supporting and troubleshooting clients which do (or do not) support passive mode. As an example, the command line FTP utility provided with Solaris does not support passive mode, necessitating a third-party FTP client, such as ncftp.
With the massive popularity of the World Wide Web, many people prefer to use their web browser as an FTP client. Most browsers only support passive mode when accessing ftp:// URLs. This can either be good or bad depending on what the servers and firewalls are configured to support.
Passive FTP Example
Below is an actual example of a passive FTP session. The only things that have been changed are the server names, IP addresses, and user names. In this example an FTP session is initiated from testbox1.slacksite.com (192.168.150.80), a linux box running the standard FTP command line client, to testbox2.slacksite.com (192.168.150.90), a linux box running ProFTPd 1.2.2RC2. The debugging (-d) flag is used with the FTP client to show what is going on behind the scenes. Everything in red is the debugging output which shows the actual FTP commands being sent to the server and the responses generated from those commands. Normal server output is shown in black, and user input is in bold.
Notice the difference in the PORT command in this example as opposed to the active FTP example. Here, we see a port being opened on the server (192.168.150.90) system, rather than the client. See the discussion about the format of the PORT command above, in the Active FTP Example section.
testbox1: {/home/p-t/slacker/public_html} % ftp -d testbox2
Connected to testbox2.slacksite.com.
220 testbox2.slacksite.com FTP server ready.
Name (testbox2:slacker): slacker
—> USER slacker
331 Password required for slacker.
Password: TmpPass
—> PASS XXXX
230 User slacker logged in.
—> SYST
215 UNIX Type: L8
Remote system type is UNIX.
Using binary mode to transfer files.
ftp> passive
Passive mode on.
ftp> ls
ftp: setsockopt (ignored): Permission denied
—> PASV
227 Entering Passive Mode (192,168,150,90,195,149).
—> LIST
150 Opening ASCII mode data connection for file list
drwx—— 3 slacker users 104 Jul 27 01:45 public_html
226 Transfer complete.
ftp> quit
—> QUIT
221 Goodbye.
Summary
The following chart should help admins remember how each FTP mode works:
Active FTP :
command : client >1024 -> server 21
data : client >1024 <- server 20
Passive FTP :
command : client >1024 -> server 21
data : client >1024 -> server >1024
A quick summary of the pros and cons of active vs. passive FTP is also in order:
Active FTP is beneficial to the FTP server admin, but detrimental to the client side admin. The FTP server attempts to make connections to random high ports on the client, which would almost certainly be blocked by a firewall on the client side. Passive FTP is beneficial to the client, but detrimental to the FTP server admin. The client will make both connections to the server, but one of them will be to a random high port, which would almost certainly be blocked by a firewall on the server side.
Luckily, there is somewhat of a compromise. Since admins running FTP servers will need to make their servers accessible to the greatest number of clients, they will almost certainly need to support passive FTP. The exposure of high level ports on the server can be minimized by specifying a limited port range for the FTP server to use. Thus, everything except for this range of ports can be firewalled on the server side. While this doesn’t eliminate all risk to the server, it decreases it tremendously. See Appendix 1for more information.
References
An excellent reference on how various internet protocols work and the issues involved in firewalling them can be found in the O’Reilly and Associates book, Building Internet Firewalls, 2nd Ed, by Brent Chapman and Elizabeth Zwicky.
Finally, the definitive reference on FTP would be RFC 959, which sets forth the official specifications of the FTP protocol. RFCs can be downloaded from numerous locations, including ftp://nic.merit.edu/documents/rfc/rfc0959.txt.